Monday, October 19, 2009

A Few Tips For Shooting Photos With Handheld Camera At Slow Shutter Speed

During my last trip to Japan I had to shoot a lot with low light and without a tripod so after that I decided to put down a few notes on how to shoot photos with handheld camera and at slow shutter speed.

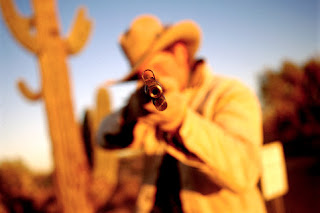
Here are a few tips for better handheld shooting. Following these techniques will help you take sharp photos in shutter speeds as low as 1/10s or slower with a normal lens. To achieve that use the classic army approach to sharpshooting. Good shooting is a HABIT - proper Holding, correct point of Aim, controlled Breathing, Instinctive body position, and gentle Trigger control.

H - Holding. Holding your camera must be firm enough to support it in the most comfortable position, but must not be so tight that you are straining your muscles. When you strain your muscles, they start to shake. The result is that your camera will shake and this makes aiming more and more difficult.

A - Aiming. Take a moment to properly aim your shot. This particular rifle-shooting tip does not really apply to the camera shooting as with aiming a rifle you have many factors to consider, such as distance, wind etc. But anyway having time for proper shot planning helps reducing shake.

B - Breathing control. As you breathe, the sight will naturally move up and down the target with your body. The trick is to take a couple of good breaths to relax and to steady your heartbeat. When you are ready to pull the trigger, take a deep breath, exhale half way and then hold the breath. Now you can gently squeeze the trigger. Be careful that you don't hold your breath for too long, or your vision will start to blur and you'll have to start all over again.

I - Instinctive positioning. Instinctive body positioning is just getting comfortable. The more comfortable you are, the less muscle pressure you have to use. Your body should be in a natural position, a good way to check this is to close your eyes for a moment, relax, and then see if you are still aiming at the same point after you open your eyes again. Use your surroundings to steady your body. Leaning against a solid object is as useful as using a monopod. You can lean against a tree, a wall, a lamp post or anything else you can use while shooting your photo. Use your surroundings to steady your camera. You can lean your camera on the top of a fence or a car or a rock or pretty much anything that is around you.

T - Trigger control. This is very important skill and is one of the hardest skills to master. When the trigger is pulled properly, the camera will not move. Shot should come as a surprise to you, apply steady pressure on the trigger until the action fires, after the shot has been fired, hold the trigger down and "follow through" on the target, holding steady aim, this avoids the body's natural tendency, to "jerk" in anticipation of the recoil. So hold the camera still after shooting.

And here are a few non-rifle tips:

Use stabilised lenses (VR, IS or OS) if possible. These allow you to shoot handheld at slower shutter speeds while compensating for any camera movement that may be induced. Combine a stabilised lens with a good handholding technique and camera shake should be virtually eliminated.

Adjust the shutter speed/aperture combination for low light shooting. Try to open up the aperture to allow shooting at a higher shutter speed. You can also change the ISO value on the camera. If you normally shoot photos at ISO 100 or ISO 200 and the camera indicates this photo will be shot at 1/15sec then increasing to ISO 800 will allow you to shoot at 1/125 or 1/60sec respectively. And of course the higher the shutter speed the less camera movement is visible in the image. This tip is a well-known tip but many people afraid shooting at high ISO (like ISO 800 or ISO 1600) or open aperture too much. Modern DSLRs have less noise at the same ISOs as film has. Fujicolor 400 NPH was standard de-facto for wedding photographers for years. Modern DSLRs have less noise at ISO 400 than NPH has. So don’t be afraid shooting at high ISOs. Noise is nothing – picture is everything!

Set your camera to continuous high-speed shooting and take a series of shots. Pressing the shutter moves the camera, but keeping it held down for a couple of seconds keeps the camera steady.

Learn how to hold your camera properly. You can use Joe McNally "Da Grip" technique.


Or as alternative you can use similar camera grip technique shown on the following photo by travel photographer Dima Chatrov.
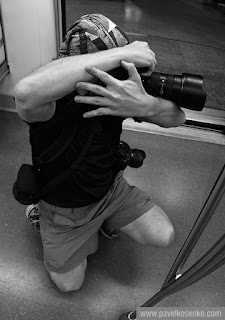
Proper Camera Grip for Handheld Shooting at Slow Shutter Speed
Photo by Pavel Kosenko

And the last very important tip:
Practice! Nothing is more important than shooting more and more. Practice makes perfect.

Also you are welcome to check my little Gallery of Japan Images from my last trip.

Tuesday, September 1, 2009

12 Best Photography Spots for Classical Sydney Skyline. Photographer's Guide.

Harbour Bridge at Sunset from Luna Park, Sydney, NSW, AustraliaI'm often asked by people who are travelling to Sydney what to photograph there. So I've decided to write down some notes about shooting Sydney. Sydney skyline to be precisely. It's not a comprehensive Sydney city photography guide but it will give you a good idea of shooting locations around Sydney CBD (i.e. downtown), when to shoot there and how to get there. It could be very useful if you have limited time but still want to get some nice photos. By browsing through the images in this guide you can decide where to go to get the view you want.

Photographers, whether they are hobbyists or professionals, oftentimes explore a place much differently than a typical traveller. With camera in hand and in search of the best photo opportunities, they are looking for better lighting and better compositions. They want the angle, the mood, the light and some magic. You can find all that in Sydney as well but if you're a first time photographer to Sydney, this photographer's guide to Sydney skyline could be useful to you so you can head straight to the photo booty, so to speak.

These 12 spots cover almost all classical Sydney city views. However there are endless possibilities and angles to shoot Sydney and famous Sydney icons along the shorelines. All these places and lookouts are easily accessible by foot, by public transport or by taxi/car...

Read the full "12 Best Photography Spots for Classical Sydney Skyline, Photographic Guide" article on my Fine Art Landscape and Travel Photography web site or leave comments to the article in my Travel Photography Blog.

Also you are welcome to check my little Gallery of Sydney Images including Sydney Opera House Gallery and Sydney Harbour Bridge Images.

Monday, August 31, 2009

The best and useful "Depth of Field" explanation

Internet is full of articles explaining Depth of Field theory, Hyperfocal Distance, how to calculate DOF and hyperfocal distance, DOF tables for different lenses and even DOF calculators iPhone. They all are pretty much the same, using the same formulas and the same words. I used to beleive in all that until a while ago I've read a great article "Adjusting Depth of Field" by Harold M. Merklinger, an author of "The Ins and Outs of Focus" and "Focusing the View Camera" books. This article tells about three well-known myths like "one-third rule", focus on hyperfocal distance and DOF tables. He also challenges traditional DOF theory by turning in on its head. No longer is the Circle of Confusion the basis for judging DOF. His indepth analysis of the problem will problably leave you a convert for life.

Be patient and open minded. Most of us find that his ideas sound like they are at odds with what we've been taught, but he provides empirical evidence ("photos") to support his claims. Whether or not you choose to adopt his methods, it's worth reading and it really works for all cameras, landscape shots and wide angle to short telephoto lenses.

(as published in Shutterbug magazine in Oct. 1991 and May - July 1992)

There is one more web page that compliments this article, it is called "Depth of Field Revisited", which you probably would want to read as well.

Friday, June 19, 2009

YASSC - Yet Another Sunrise/Sunset Calculator


For a while I was using a method for predicting Moon and Sun positions similar to what Andre Gunther explained in his great tutorial Predict the moon for better photos. Before Google Earth I was using maps, compass and using The Sun/Moon Calculator or the Australian ones from Geoscience Australia Geodesy & GPS - Astronomical Information.

But now we've got absolutely fantastic tool from Stephen Trainor - "The Photographer's Ephemeris". It uses Google Earth maps and shows sunrise/sunset and moonrise/moonset azimuth on maps, twilight times etc. You can also search and save your favorite locations for future use. It's cross-platform (uses Adobe AIR) and it's free! Must have software for every outdoor photographer!

http://stephentrainor.com/tools

Thursday, June 4, 2009

Using External Hard Drives as Offline Archiving System

Stock Photo, Hard Disk, DriveThere are two types of digital photographers; those who’ve had a hard drive crash and those waiting to have one. I’m pretty sure that almost every photographer (even who is still waiting for a hard drive crash) thought about backing up photos at least to free up some space on computer’s hard drive. CDs or DVDs have small capacity and not reliable – any serious scratch could destroy many photos. RAID arrays are good for protecting your data and for fast access but they are expensive and are not an archiving solution – it quite difficult to expand them. As far as I know right now only Netgear has Network Attached Storage (NAS) with RAID that can be easily expanded. External hard drives are cheap and easy to use but this approach also has it’s own drawbacks – no redundancy, difficult to manage etc. However some people are developed a very good approach with using external hard drives as offline archiving storage.

I would like to share a few links to articles about archiving digital photos with external hard drives. The first one is written by Quang-Tuan Luong, great large format photographer. Have a look at the Digital post processing - Computers and storage section. Sorry, there is no direct link - you need to scroll a little bit.

The second and third articles are from "Image Mechanics" - digital capture company from Los Angeles. They developed very efficient and cheap offline archiving system based again on external hard drives.
Part 1: Image Mechanics Off-line Archiving System
Part 2: Image Mechanics Off-line Archiving System: The Next Generation

I hope this will help you to protect your photos.

Tuesday, June 2, 2009

The Pinnacles Desert, Nambung National Park, Western Australia. Photographic Guide.

The Pinnacles, Nambung National Park, Western AustraliaThe Pinnacles are located in Nambung National Park, about 25 kilometres south from the town of Cervantes and about 250 kilometres north of Perth, Western Australia. The Pinnacles were sculptured by wind, rain, vegetation, sun and time for many thousands of years from limestone. These limestone formations reach four metres tall of sand of varying...

Read the full "The Pinnacles Desert, Nambung National Park, Western Australia, Photographic Guide" article on my Fine Art Landscape and Travel Photography web site or leave comments to the article in my Travel Photography Blog.

See a little Gallery of The Pinnacles Images, Nambung National Park, WA, Australia.

Sunday, May 31, 2009

7 Effective Waterfall Photography Tips. Photography Guide.

Sylvia Falls, Valley of the Waters, Wentworth Falls, NSW, AustraliaDo you know how to shoot waterfalls like a pro from National Geographic magazine? Have you ever wondered how those lucky professional photographers manage to shoot great photos of waterfalls that look like they are in motion? You can also take the better waterfall pictures with using a few simple tips while taking photographs. Here are 7 simple but very effective tips that will help you to take better waterfalls pictures...

Read the full "7 Effective Waterfall Photography Tips, Photography Guide" article on my Fine Art Landscape and Travel Photography web site or leave comments to the article in my Travel Photography Blog.

See a little Gallery of Waterfall Images.